Desire2Learn > Tools > Virtual Classroom >
Audio & Video Basics in Virtual Classroom
This page will provide the basic instructions and troubleshooting tips regarding the use of audio and video within a Virtual Classroom Meeting space.
Quick Tips
- Users completely new to Virtual Classroom may want to read the general overview here.
- Before entering the meeting, we recommend reviewing the quick tips and session management instructions located on the meeting lobby page.
- You can use this website's service to verify that your browser has permission to use webcam, and you can use this website’s service to check that your browser has permission to use the microphone.
NOTE: You may also need to Allow access to the microphone and camera in your system Privacy settings.
- If you would like to change your webcam or microphone selection, you will need to adjust the permissions settings within your browser.
- For Chrome, in Settings > Privacy and Security > Site Settings, select Camera or Microphone. Set the default camera or microphone you want to use in the dropdown selector. You will need to reshare your webcam or audio for the correct device to be used.
- For Firefox, you select the camera and microphone when sharing. If you did not select "remember setting" during the share, just unshare your webcam or microphone and reshare using the correct webcam or microphone. If you selected the remember setting, you will need to change that by going into Preferences, and Privacy & Security. Under Permissions, select Camera or Microphone settings. This will show the websites that have requested your camera or microphone. You will need to remove the Bongo server with the wrong camera/microphone, and then go back and reshare your webcam or audio in Virtual Classroom.
- If you are experiencing network issues or poor performance, you can disable webcams being displayed to you in Virtual Classroom Settings.
- If you hear feedback after joining audio, try reducing the volume on your device.
Will you speak, or listen only?
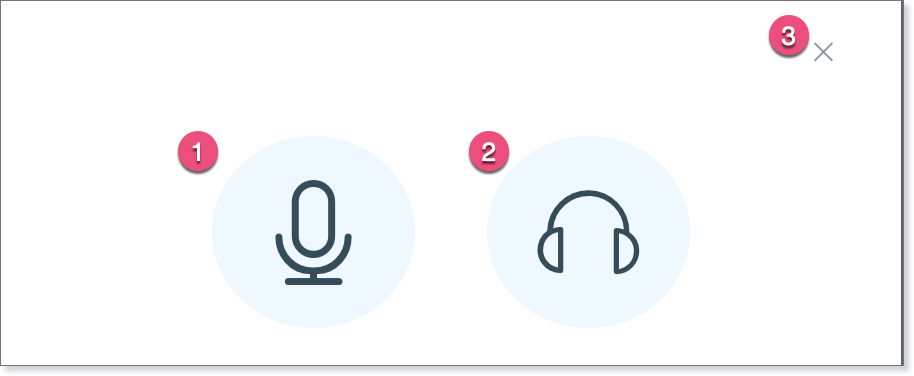
- If you intend to speak/present at any point, click the microphone icon. Please note: you will need to allow permission for your browser to access your mic.
- If you are going to listen only and do not intend to speak, click the headphone icon.
- Do NOT click the X, as you will be unable to speak or listen.

Echo Test
The echo test will ensure that your microphone and speakers are working within our system. Only click the thumbs up icon if you can hear yourself, and if you do not hear yourself, click the thumbs down icon.

Audio Settings
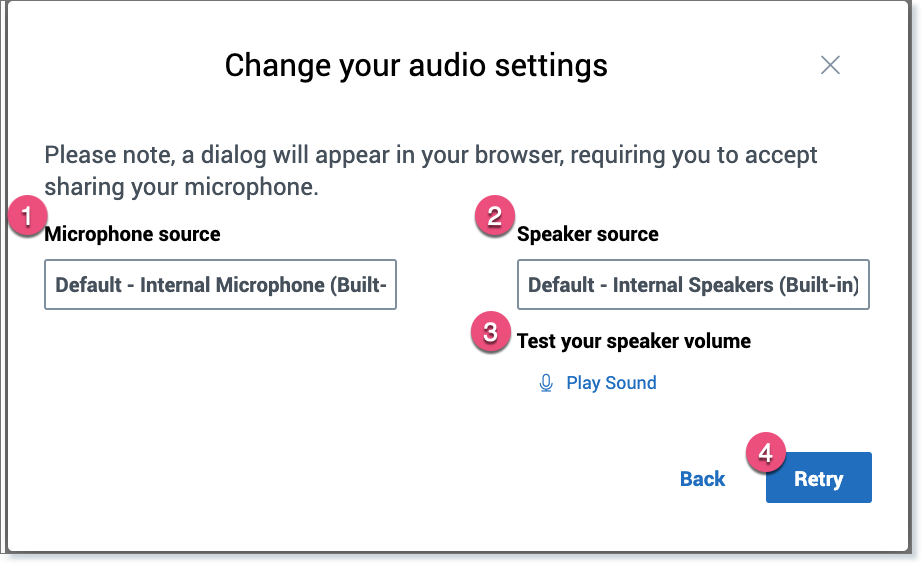
If you fail the echo test, you may:
- need to change your microphone source.
- need to change your speaker source.
- test your speakers here.
- retry the echo test after changing the settings.

Meeting Audio
|
|
If you don’t see the mic symbol, no one can hear you. You’ll need to click Join Audio. |
|
|
Make sure the mic symbol is pulsing when you’re speaking. |
|
|
You can mute and unmute yourself. |
|
|
If you click Leave Audio, you’ll no longer be able to speak or hear audio. |
Webcam Sharing
Now that you’re all set with audio, you could share your webcam. In Virtual Classroom, up to 7 webcams can be shared simultaneously. Depending on the settings, you may or may not be allowed to have your webcam shared. For more info, please review the sharing tutorial on how to share your webcam within a Virtual Classroom meeting.
