Desire2Learn > Tools > Quizzes Overview >
Changing Quiz Settings
There are many settings options for quizzes. The most common ones are listed below. Contact the Instructional Improvement and Distance Learning help desk at d2lhelpdesk@elgin.edu if there are questions about a quiz setting that is not listed here.
Start, Due, and End Dates for a Quiz
Start, Due, and End Dates can be used to make a quiz available to students for a limited time. Students will be able to view information about the quiz, but will not be able to start taking it before the Start Date or after the End Date. There are two types of date restrictions for quizzes.
- A Due Date is the instructor-given date (and time) deadline for submitting a quiz (or assignment). However a student may submit after the Due Date (up until an End Date, if one is set), in which case it is marked late, in red, in both the instructor and the student view.
- An End Date is more restrictive. It cuts off the quiz at the End Date and time set, where the student can no longer start a quiz.
Note: An End Date only restricts the ability to start the quiz, not to complete the quiz. For example, if a student starts a quiz that has a 60 minute time limit at 5 minutes before the End Date/time the student will still have 60 minutes to complete the quiz.
- If a Due Date and End Date are both set, then the submission can be submitted late, after the Due Date, until the End Date is reached.
Setting Start, End and Due Dates
- Select the quiz name.
- Select Restrictions.
- The Restrictions page will open. Do any/all of the following:
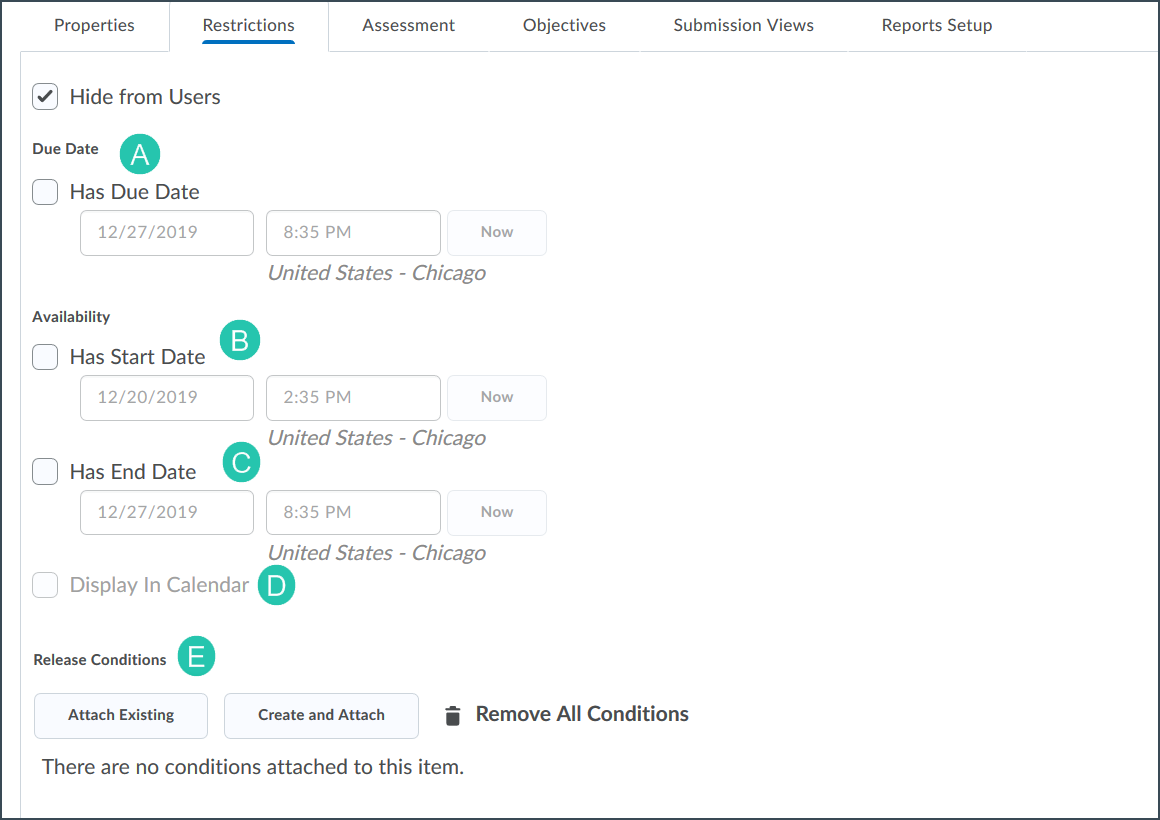
- Select the Has Due Date checkbox A to set a Due Date for the quiz, and enter the appropriate date and time.
- Select the Has Start Date B checkbox to set a Start Date for the quiz, and enter the appropriate date and time.
- Select the Has End Date C checkbox to set an End Date for the quiz, and enter the appropriate date and time.
- Select the Display in Calendar D checkbox to display the quiz Start and/or End Dates in the course calendar.
- Select Release Conditions E and add release conditions to make this quiz only viewable after the students have met specified criteria.

- Select
Save and Close when the setting changes are complete.
Note: Start, Due, and End Dates on a quizzes can also be set in Content if the quiz is linked in a content module. See Content for more information.
Set Time Limit and Late Submission Options for a Quiz
- Select the quiz name.
- Select Restrictions.
- Select Enforced Time Limit to enable a time limit for students to complete the quiz
- Enter the number of minutes students are allowed to complete the quiz.
- Enter the number of minutes for a Grace Period. The grace period is the number of minutes students have after the time limit has expired to submit their quiz before it is flagged as late.
- Select the desired behavior after the Grace Period has been exceeded:
- Allow the student to continue working. The student may continue to make changes and submit after the grace period. The quiz will be marked as late.
-
Prevent the student from making further changes. The student will not be able to make changes once the grace period has passed. The student will only be able to submit.
Note: When faced with the inability to make changes students often panic and leave the quiz without submitting. See the section "Submitting a Student's Quiz Attempts" in Solving Issues with Submitting Quizzes to learn how to resolve this issue.
- Allow the student to continue working, but automatically score the attempt as zero after an extended deadline. The student may continue to make changes and submit after the grace period. When they do so, the quiz will automatically be given a zero. The instructor will need to manually grade as little or as much of the quiz a they choose.
- Select Save and Close.
Set Special Access
Use this section to grant special access to certain individual students, allowing them time and date restrictions that are different than the rest of the class, and/or granting special time limits on the quiz.- Select the quiz name.
- Select Restrictions.
- Select Add Users to Special Access .
- Set the "Special Access Properties" from the options provided. Any of the setting can be changed including Start/End dates, Amount of Time and/or the number of attempts.
- Select the student(s) to receive these new restrictions.
- Select Add Special Access.
Note: If multiple students get the same new restrictions they can be added all at one time. Repeat for each student (or set of students) that require special settings.
Change the Number of Times Students can Take a Quiz
By default, students are allowed one chance to take a quiz. Instructors may choose to allow students multiple attempts.
Note: If multiple attempts are allowed and the quiz is associated with a grade item, the score to be transferred to the gradebook will need to be specified.
- Select the quiz name.
- Select Assessment.
- Multiple settings for grading will be displayed.
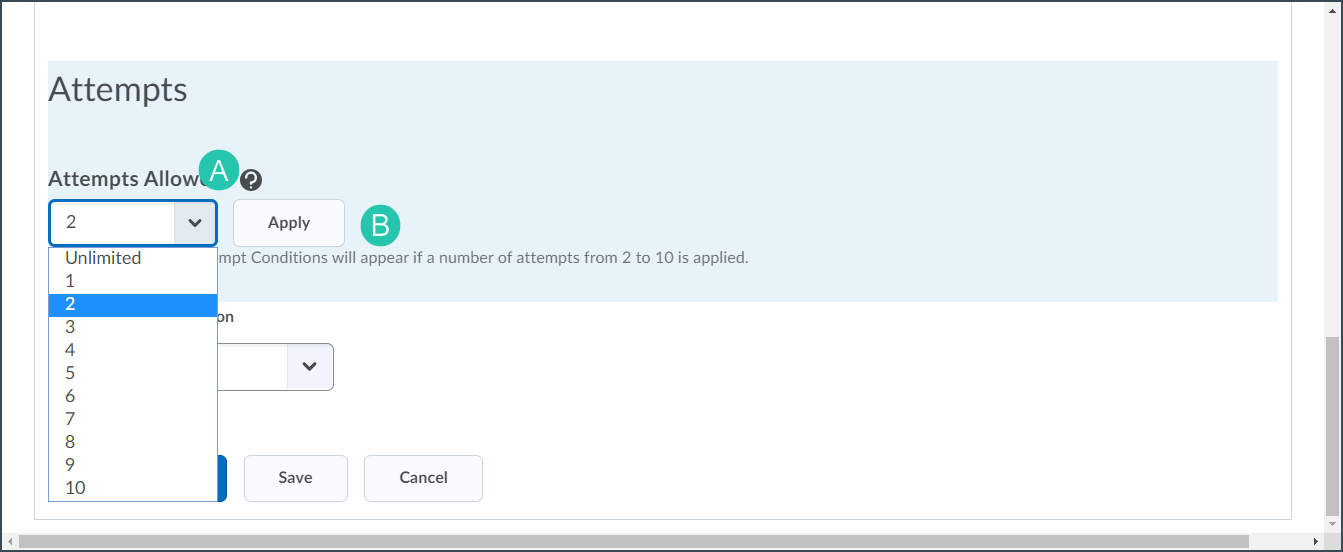
- Select the dropdown arrow on the "Attempts Allowed" menu A and select a number.
- Select
Apply B .

- Select an option in "Overall Grade Calculation" to specify how the quiz score will be calculated. (The default option is Highest Attempt, but there are several other options, including Average Score.)
- Select Save and Close.
Note: Change the number of attempts across multiple quizzes on the "Manage Quizzes" page by selecting the checkboxes next to the names of the quizzes, then select the Bulk Edit link at the top of the list. Reset the number of attempts for each quiz in the "Attempts Allowed" column.
Display Questions and Answers after Students have Completed a Quiz
By default, only the overall quiz score achieved by a student is displayed on the quiz submission confirmation page. An instructor can choose to adjust the default submission view to include other elements like feedback, questions that the student answered incorrectly, questions the student answered correctly and/or the correct answers. It is also possible to add additional views that are available after a specific date.
Note: If date restricted submission views have been added to a course the instructor will want to be sure to revise the dates when the course is copied into a future term section as these views will be immediately visible to students as the dates will be in the past.
- Select the quiz name.
- Select Submission Views.
- Select the view setting to be changed:
- Select Default View to change the information that is displayed on the confirmation page that appears when a student submits a quiz attempt.
- Select Add Additional View to enable additional feedback to be released by date.
- Select the button next to Yes in the "View Details" section to display quiz questions to students.
- Select the type of quiz questions to display.
- Select the box next to Show Question Answers to display the correct answers to the questions displayed.
- Specify when the information is available by selecting a date and time in the "View Restrictions" section (follow this step only when adding an additional view).
- Select Save.
Note: To ensure that quiz questions and answers are not available past the time the quiz is available, create a second Additional View within the Submission Views tab and name it “Shut down view.” Select No in the "View Details" section and select the date/time the first additional view should close to students. This second additional view will “shut down” the first additional view as only the most recent submission view is the active one. This is particularly important if instructors are planning to migrate the quiz to another semester. Failure to “shut down” the first additional view will allow students in future semesters to use the view right after completing the quiz, which could facilitate cheating. Even if the quiz will not be re-used in the future, setting up a “shut down view” is a best practice that prevents future problems.
Set Respondus Lockdown Browser
Respondus Lockdown Browser is a tool that can be used to help prevent cheating when students are taking an exam in a proctored environment like a lab. It is not recommended for use in a non-proctored environment as it only affects the device the student is using to take the exam. For online classes that require proctoring of remote exams, see Using Respondus Monitor for information on remote proctoring.
- Select Quizzes.
- Select LockDown Browser A.
- Select the down arrow next to the quiz name B.
- Select Settings C.

- The "settings" page will open. Select Require Respondus LockDown Browser for this exam.
- (Optional) Set a password.
- Select any additional advanced settings.
- Select Save + Close.
NEXT STEPS
Once changes to the quiz settings have been changed, preview it to make sure everything is correct before students begin taking it. View Previewing Quizzes for more information.
